Documentation
PH HOA Online — Page Instructions
Step-by-step guide for HOA staff using the admin panel. Each section covers what the page is for, who can use it, and how to complete common tasks.
Before you start: Log in at /login with your Subdivision Code, Email, and Password. Menu items appear only if your role and page permissions allow access.
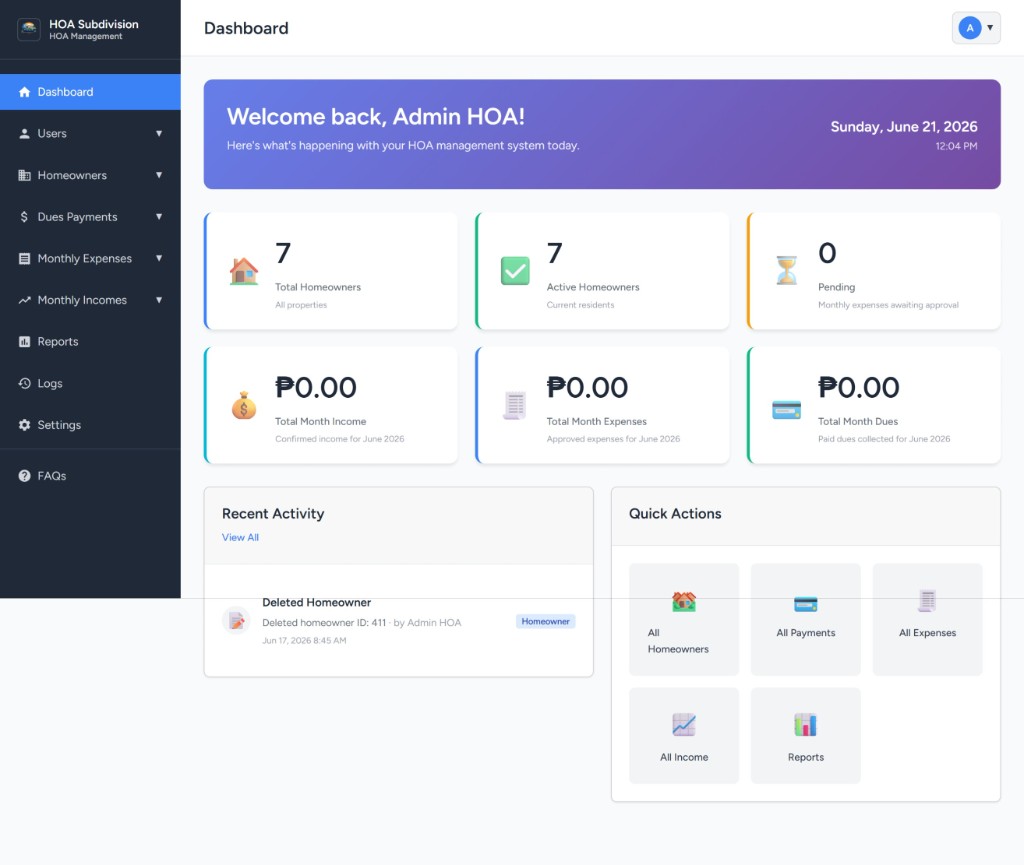
Menu: Dashboard URL: /admin/dashboard
Purpose
The Dashboard is your home screen after login. It gives a quick snapshot of homeowners, pending work, and this month’s finances.
Who can access
All logged-in admin users. Dashboard access is always enabled.
What you see
| Section | Description |
|---|---|
| Welcome header | Your name and today’s date/time |
| Stat cards | Total Homeowners, Active Homeowners, Pending expenses count, Total Month Income, Total Month Expenses, Total Month Dues |
| Recent Activity | Last system actions (from Activity Logs) |
| Quick Actions | Shortcuts to Homeowners, Payments, Expenses, Income, Reports |
| System Overview | Connection and version info |
Stat card meanings
| Card | Meaning |
|---|---|
| Total Homeowners | All homeowner records in your subdivision |
| Active Homeowners | Homeowners with status Active |
| Pending | Count of monthly expenses waiting for approval |
| Total Month Income | Sum of confirmed income for the current month |
| Total Month Expenses | Sum of approved/paid expenses for the current month |
| Total Month Dues | Sum of paid dues collected this month (by payment date) |
Common tasks
Go to a module quickly
- Open Dashboard
- Click a button under Quick Actions (e.g. All Payments, Reports)
Review recent changes
- Scroll to Recent Activity
- Read action, type, description, user, and time
- Open Logs from the sidebar for the full history
Menu: Calendar URL: /admin/calendar
Purpose
Keep meetings, deadlines, and community events in one shared calendar for officers and staff.
Who can access
Staff with Calendar permission. Create/edit access depends on calendar create/edit permissions.
What you can do
| Task | How |
|---|---|
| View events | Open Calendar; use month, week, day, or list views |
| Add an event | Use Create / click a date (if permitted) |
| Edit or remove | Click an event, then update or delete |
| Mobile view | On phones, the calendar defaults to a week list layout that fits the screen |
Tips
- Use the calendar for board meetings, dues deadlines, and association events
- Events are scoped to your subdivision
Menu: Users → All Users / Add New User / Roles URL: /admin/users
Purpose
Manage staff accounts that can log into the admin panel (admin, president, treasurer, board officers, etc.).
Who can access
- Admin (and roles with Users permission)
- Requires Users page permission
All Users page
Sections:
- Add New User button (top right)
- Filters: Search (name/email), Role
- User table: Name, email, role, subdivision, actions
- Force Logout (admin): End another user's session (not your own)
How to add a new user
- Go to Users → Add New User
- Fill in:
- Full Name (required) - Email Address (required) — login credentials are emailed here - Role (required): Admin, President, Vice President, Treasurer, Secretary, Auditor, Board of Directors, or a custom role - Subdivision (when applicable) - Page Access — check boxes for each module (use Check all per section), or leave all unchecked for full access - Password (optional): leave blank to auto-generate, or enter a manual password when permitted
- Click Create User
- The system emails login credentials to the user
How to edit a user
- On All Users, click Edit on the row
- Update name, email, role, subdivision, or page access
- Password Reset (when permitted):
- Check Generate a new password and email it to the user, or - Enter New Password and Confirm New Password (do not use both options at once)
- Save changes
How to force logout a user
- On All Users, click Force Logout on the row (admin only; not available on your own account)
- Confirm — the user must sign in again on their next visit
Custom roles
- Go to Users → Roles (
/admin/users/roles) - Create or edit a role name, description, and default page access
- Optionally apply updated defaults to existing users with that role
How to delete a user
- On All Users, click Delete on the row
- Confirm the action
Tips
- New users must use the Subdivision Code assigned to their subdivision when logging in
Menu: Homeowners → All Homeowners / Add New Homeowner / Active / Pending / Inactive URL: /admin/homeowners
Purpose
Maintain the list of property owners and renters in your subdivision (block, lot, contact info, status, balances).
Who can access
Subdivision staff with Homeowners permissions. If the subdivision is inactive, this is often the only admin page still available (along with subscription payment under Settings).
All Homeowners page
Top buttons:
| Button | Action |
|---|---|
| Export CSV | Download homeowners for your subdivision |
| Import CSV | Bulk upload from a spreadsheet |
| Add New Homeowner | Create one record manually |
Search & filters:
- Search by name, block, lot, phone, or email
- Filter by status: Active, Pending, Inactive
Table / mobile list: Name, Block, Lot, contact details, Status, Unit Owner Type, Remaining Balance, Actions
How to add a homeowner manually
- Click Add New Homeowner
- Enter required fields: Name, Address, Phone
- Optional: Block, Lot, Email, Unit Owner Type (Owner/Renter), Status, Note
- Remaining Balance can be set by Admin only
- Click Save
Block + Lot must be unique within your subdivision. Manual create does not set a portal access code.
How to import homeowners (CSV)
- Click Import CSV
- Click Download Sample Template if you need the correct format
- Prepare your file with columns: Name, Block, Lot, Address, Phone, Email, Unit Owner Type, Status, Note
- Do not include Subdivision ID — all rows are assigned to your logged-in subdivision
- Select the file and click Import
- Review success/error messages for each row
Import notes:
- Each imported row gets a unique 6-character access code (for homeowner portal login)
- Required columns: Name, Address, Phone
- Status must be
active,inactive, orpending(defaults to active)
How to export homeowners
- Click Export CSV
- File downloads with homeowner data for your subdivision
How to edit or delete a homeowner
- Click Edit on the row to update fields
- Click Delete (Admin only) and confirm
How to view Statement of Account (SOA)
- Click Statement of Account on the homeowner row (or from Balance Check)
- Review summary totals, payment history, and remaining balance
- Use Print for a printable version
Homeowner statuses
| Status | Use when |
|---|---|
| Active | Current resident; included in dues generation |
| Pending | New or awaiting setup |
| Inactive | No longer active in the subdivision |
Menu: Dues Payments → All Payments / Add Payment / Monthly Report / Balance Check / OR Check / Monthly Due Print / Pending / Paid URL: /admin/monthly-dues-payments
Purpose
Record and track monthly HOA dues and remaining-balance payments, reconcile Official Receipt (OR) reference numbers, and review balances.
Who can access
Subdivision staff with Dues Payments permissions. Create/edit and status changes depend on page permissions. Delete is typically Admin only.
Sidebar / page shortcuts
| Page | URL | Purpose |
|---|---|---|
| All Payments | /admin/monthly-dues-payments | Full payment list with filters |
| Add Payment | /admin/monthly-dues-payments/create | Record a new payment |
| Monthly Report | /admin/monthly-dues-payments/report | Paid/unpaid summary for a month |
| Balance Check | /admin/monthly-dues-payments/balance | Outstanding dues and remaining balances |
| OR Check | /admin/monthly-dues-payments/or-check | Reference numbers with total amount each |
| Monthly Due Print | /admin/monthly-dues-payments/print | Print dues notices/receipts |
| Pending / Paid | filtered All Payments | Quick status views |
All Payments page
Top buttons: Export CSV, Balance Check, OR Check, Monthly Report, Monthly Due Print, Add Payment
Filters: Status, Name Block/Lot, Year, Month, Reference, and related date filters
Check Missing Reference: Scan a numeric OR range for gaps (helps catch skipped receipt numbers)
Payment types
| Type | When to use |
|---|---|
| Monthly Dues | Regular monthly fee for specific month(s) |
| Remaining Balance | One-time payment against an existing balance owed |
Amount rules
- For Monthly Dues, the Amount (per month) comes from the subdivision Monthly Fee and is locked (not editable) on create and edit
- For Remaining Balance, enter the amount to pay (editable)
Start Month and Year
If your subdivision set Start Month and Start Year under Settings → Others:
- Year dropdowns on Add/Edit Payment start from that year
- Months before the start month are disabled when the start year is selected
- Existing payments recorded before the start period remain editable
Payment status permission
Users with Status page access (dues_payments_status) can set Pending, Paid, or Waived. Users without Status permission can still record payments, but status is saved as Pending.
How to record a payment
- Click Add Payment
- Choose Payment Type (Monthly Dues or Remaining Balance)
- Select Name Block/Lot
- For Monthly Dues:
- Select Year and one or more Months - Paid/waived months are disabled; pending months can be selected when updating status
- Confirm Amount, Payment Date, Payment Method (Cash, GCash, Other), and Reference Number (required)
- Set Status (if permitted)
- Click Add Payment
How to edit a payment
- From All Payments, open the edit popup or edit page
- Update allowed fields (amount stays locked for monthly dues)
- Save
How to mark a payment as paid
- Find the pending record on All Payments
- Click Mark as Paid (or edit and set status to Paid)
- For remaining-balance payments, the homeowner’s remaining balance is reduced when marked paid
How to use Monthly Report
- Go to Dues Payments → Monthly Report
- Select year and month
- Review paid homeowners, unpaid list, and collection rate
- Use Process Month (when available) to generate pending dues for active homeowners using the Settings monthly fee
How to use Balance Check
- Go to Balance Check
- Filter by homeowner or balance if needed
- Click a homeowner name to view details in a popup
- Use the SOA action icon for Statement of Account, or the eye icon to open payments for that homeowner
How to use OR Check
- Go to OR Check (
/admin/monthly-dues-payments/or-check) - The page defaults to the current month and year
- Review each Reference No. with:
- Payment count - First / last payment date - Total amount for that reference
- Filter by reference text, month, or year; Clear returns to the current period
- Click the eye icon to open All Payments filtered to that reference
- References sort descending (highest first)
How to print dues
- Go to Monthly Due Print
- Configure print options and preview
- Print or save receipts/notices
Tips
- One paid/waived record per homeowner per month for monthly dues
- Use OR Check before board reporting to verify receipt totals
- Use Check Missing Reference on All Payments to find gaps in numeric OR sequences
- Dashboard Total Month Dues uses the payment date in the current calendar month
Menu: Monthly Expenses → All Expenses / Add New Expense / Expense Categories / Pending / Approved / Paid URL: /admin/monthly-expenses
Purpose
Record subdivision expenses and route them through an approval workflow before they count in reports.
Who can access
Staff with Monthly Expenses permissions. Approve/reject requires the Approve page permission (monthly_expenses_approve).
All Expenses page
Summary cards: Total Expenses, Pending Approval, Approved count, Total Amount (approved/paid only)
Filters: Status, Category, Year, Month
Top button: Add New Expense
Expense statuses
| Status | Meaning |
|---|---|
| Pending | Submitted, awaiting approval |
| Approved | Approved by officer; counts in reports |
| Rejected | Not approved |
| Paid | Marked as paid |
How to add an expense
- Click Add New Expense
- Fill in Category, Description, Amount, Expense Date
- Optional: Vendor, Invoice Number, Payment Method
- Click Save — new expenses start as Pending
How to approve or reject an expense
- Find the pending expense on the list (or filter Pending)
- Click Approve or Reject, or edit and change status
Expense Categories
Menu: Monthly Expenses → Expense Categories
- View system default categories and subdivision-specific categories
- Add, edit, or delete custom categories (when permitted)
- System categories cannot be removed
Tips
- Dashboard Pending = expenses with status Pending
- Only Approved and Paid amounts appear in summary totals and Financial Reports
Menu: Monthly Incomes → All Incomes / Add New Income / Income Categories / Pending / Confirmed URL: /admin/monthly-incomes
Purpose
Record other association income (donations, rentals, amenities, etc.) with category and confirmation workflow.
Who can access
Staff with Monthly Incomes permissions. Approve/reject requires the Approve page permission (monthly_incomes_approve).
All Incomes page
Summary cards: Total Income Records, Pending Approval, Confirmed, Total Amount (confirmed only)
Filters: Status, Category, Year, Month
Income statuses
| Status | Meaning |
|---|---|
| Pending | Submitted; awaiting approval |
| Confirmed | Approved; counts in reports and dashboard |
| Cancelled | Rejected or voided |
How to add an income record
- Click Add New Income
- Fill in Category, Description, Amount, Income Date
- Optional: Name Block/Lot, Reference Number, Payment Method
- Click Save — new records start as Pending
How to approve or reject income
- Filter Pending or open Pending Approval
- Click Approve (→ Confirmed) or Reject (→ Cancelled)
Income Categories
Menu: Monthly Incomes → Income Categories
Manage subdivision income categories. System defaults are shared; custom categories are subdivision-specific.
Tips
- Dashboard Total Month Income includes Confirmed records only for the current month
- Financial Reports use Confirmed income totals
Menu: Reports → Financial Report / Dues Report URL: /admin/reports/financial and /admin/reports/dues-report
Purpose
View financial summaries and dues collection reports for board meetings and audits.
Who can access
Subdivision staff with Reports permission.
Financial Report
URL: /admin/reports/financial
- Open Reports → Financial Report
- Choose Monthly or Yearly, then year/month
- Review Expenses, Incomes, Dues Collected, Dues Outstanding, Net
- Download PDF when needed
| Total | Included records |
|---|---|
| Expenses | Approved or Paid expenses in the period |
| Incomes | Confirmed incomes in the period |
| Dues Collected | Paid dues in the period (by payment date) |
| Dues Outstanding | Pending/overdue dues for the selected period |
Dues Report
URL: /admin/reports/dues-report
- Open Reports → Dues Report
- Filter by period as needed
- Review dues collection detail for follow-up and board reporting
Tips
- Run reports at month-end after expenses are approved and incomes confirmed
- Keep PDF/CSV exports for board meetings and audit records
Menu: Logs URL: /admin/logs (or the Logs menu item in your sidebar)
Purpose
Review an audit trail of important actions taken in the admin panel.
Who can access
Staff with Logs permission.
What you can do
- Open Logs
- Browse recent actions (user, action type, description, time)
- Use filters if available to narrow by date or user
Tips
- Check Logs after bulk imports, payment processing, or permission changes
- Recent Activity on the Dashboard is a short preview of this list
Menu: Settings URL: /admin/settings
Purpose
Configure your subdivision profile: name, address, contacts, monthly fee, dues start period, logo, and subscription.
Who can access
Admin (or roles) with Settings page permission. Settings apply to your assigned subdivision only.
Settings tabs
| Tab | What you configure |
|---|---|
| General | Subdivision name, description, logo, status |
| Address | Street address, city, state, zip code |
| Others | Total units, monthly fee, Start Month, Start Year, amenities, contact person/phone/email |
| Subscription | Current plan, trial/billing info, submit subscription payment |
Important fields
| Field | Why it matters |
|---|---|
| Monthly Fee | Default amount for monthly dues (locked on payment forms) |
| Start Month / Start Year | Earliest period allowed when recording monthly dues |
| Total Units | Capacity / planning |
| Logo | Branding on the admin sidebar and related views |
| Contact info | Used on communications and records |
How to set the dues start period
- Open Settings → Others
- Choose Start Month and Start Year
- Click Save Settings
- Add/Edit Payment and related year/month dropdowns will respect this period
How to update settings
- Open Settings
- Select the tab you need
- Edit fields and click Save Settings
Subscription
- Open Settings → Subscription
- Review plan status (trial, active, etc.)
- Submit a subscription payment request when renewing or reactivating
Tips
- If you see No Subdivision Assigned, ask a system administrator to link your user to a subdivision
- Keep Monthly Fee aligned with what the board approved
- Logo: clear PNG/JPG recommended
Menu: FAQs / Report / Suggestion (and public Contact / Documentation) Related URLs: admin FAQs, Report/Suggestion, /contact, /documentation
Purpose
Help officers find answers and send feedback without leaving the system.
What you can do
| Tool | Purpose |
|---|---|
| FAQs | Read common questions for your association workflows |
| Report / Suggestion | Send a bug report or feature suggestion |
| Contact (public site) | Reach support for onboarding or account help |
| Documentation (this page) | Step-by-step instructions for each admin module |
Tips
- Prefer Report/Suggestion for product feedback; use Contact for account or onboarding help
- Documentation updates when new admin modules are added (for example OR Check and Start Month/Year)
Use this order at the start/end of each month:
1. Settings          → Confirm monthly fee and Start Month/Year
2. Homeowners        → Verify active list is up to date
3. Dues Payments     → Process month / record collections
4. OR Check          → Reconcile reference totals for the month
5. Balance Check     → Follow up outstanding balances
6. Monthly Expenses  → Enter and approve/reject expenses
7. Monthly Incomes   → Enter and approve/reject income
8. Reports           → Run financial / dues report
9. Dashboard → Review stat cards and recent activity| Field | Description |
|---|---|
| Subdivision Code | Code for your HOA (from Settings or your administrator) |
| Your staff account email | |
| Password | Your password (use Forgot Password if needed) |
Forgot password: Click Forgot password? on the login page, enter your email, and check your inbox for a new temporary password.
PH HOA Online — Page Instructions. Updated for current admin modules including Calendar, OR Check, Balance Check, SOA, and Settings Start Month/Year.